How To Create Your Own Internet Radio Station Using Icecast And Mixxx Running On Ubuntu/Debian Or Fedora - Linux Uprising Blog
This article explains how to create your own Internet radio station. To achieve this we'll use Icecast and Mixxx open source programs running on Fedora or Debian, Ubuntu, Linux Mint, Pop!_OS and other Debian/Ubuntu-based Linux distributions.
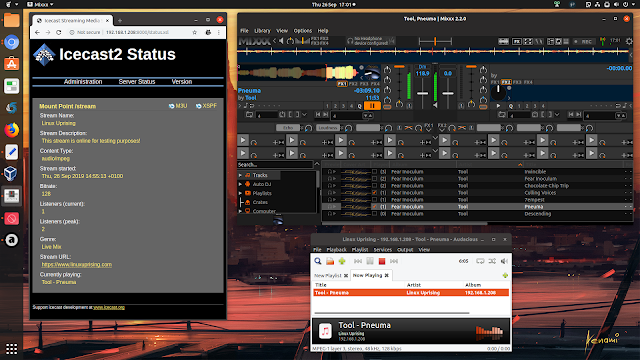
Icecast (Icecast 2) is a streaming media server which will allow users to stream our Internet radio station, and Mixxx is a DJ mixing application (which you can also use as a simple music player in this case, if that's what you need) that we'll use to feed the audio stream to the Icecast2 streaming server, thanks to its Live Broadcasting feature.
It's worth noting that you can create your own Internet radio station using Icecast2 and Mixxx on any other Linux distribution (as well as Windows and macOS), but the package names and path may be different, and some extra tweaking may be needed depending on the Linux distribution you use, that's why this article focuses on Fedora and Debian/Ubuntu only.
Before we get started, let me tell you a bit more about Icecast and Mixxx.
Icecast[1] is a free and open source, cross-platform streaming server that supports Ogg Vorbis and Theora, MP3, Opus and WebM streams, with support for multiple simultaneous audio streams (each stream being called a "mount point"). The software can be used to create a public Internet radio station, privately broadcast over the local network, and more. There are different client types that can connect to an Icecast server, either to provide a "mount point" of streaming music, like Mixxx, or to listen to the broadcasted audio.
Mixxx is a free and open source DJ software available for Windows, Mac and Linux, that includes most features common in DJS software, as well as unique features like support for advanced MIDI and HID DJ controllers. It's designed for both professional and amateur DJs, featuring BPM, key detection and sync, effects, Vinyl Record Control, auto DJ and recording, among many other features. Starting with version 1.9, Mixxx allows live broadcasting, supporting Shoutcast and Icecast streaming servers.
[2]
Installing and configuring Icecast and Mixxx to create your own Internet radio station
1. Install Icecast.
Icecast can be installed either on a separate server, or on the same computer that will be running Mixxx to broadcast.
Download Icecast for Linux/Unix and Windows[3].
Install Icecast2 from the repositories:
- Install Icecast2 on Debian, Ubuntu, Linux Mint, Pop!_OS and other Debian/Ubuntu-based Linux distributions:
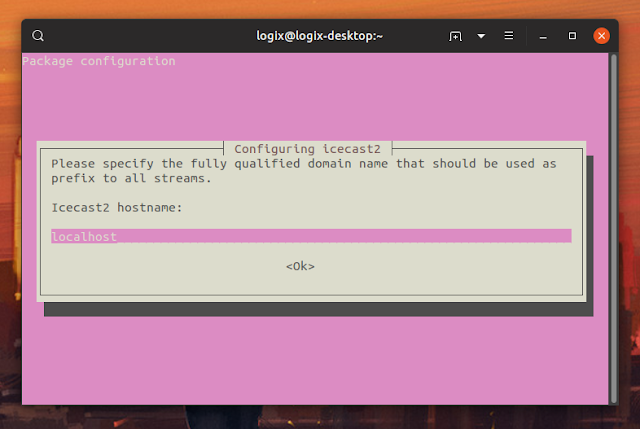
sudo apt install icecast2While installing Icecast2 on Debian or Ubuntu, you'll see some configuration options pop up (this is not the case for Fedora):
Replace the default password in each case with your own password. In case you skipped the initial configuration, you can run it again by using
sudo dpkg-reconfigure icecast2. You may also change these initial settings and more, by editing the Icecast2 configuration file (we'll get to that in the next step).- Install Icecast on Fedora:
sudo dnf install icecast2. Configure Icecast.
The Icecast configuration file path on Debian/Ubuntu (installed from a package manager) is /etc/icecast2/icecast.xml, while on Fedora it's /etc/icecast.xml. You can edit this file to change the Icecast2 Internet radio station info, set limits (limit the number of clients/listeners), change the password for 'source', 'relay' and 'admin' users, and more.
On Debian/Ubuntu, the initial Icecast2 configuration shown when first installing Icecast2 should take care of most of this configuration. You may still edit the Icecast2 configuration file.
Open this Icecast configuration file as root with a text editor, like Nano in the example below (use Ctrl + O, then Enter to save the file using Nano; to exit Nano editor after you've saved the file press Ctrl + X):
- Debian, Ubuntu, Fedora, Linux Mint, Pop!_OS:
sudo nano /etc/icecast2/icecast.xmlsudo nano /etc/icecast.xmlIn this file you can change (among others):
    <!-- location and admin are two arbitrary strings that are e.g. visible
         on the server info page of the icecast web interface
         (server_version.xsl). -->
    <location>Earth</location>
    <admin>localhost</admin>
As mentioned in the location and admin settings comments, this is information that's shown on the Internet radio server info page of the Icecast web interface, so it's only for display purposes.
This section does not exist by default on Fedora in the Icecast configuration file (it's there though at the top of the configuration file in Debian / Ubuntu).
    <authentication>
        <!-- Sources log in with username 'source' -->
        <source-password>hackme</source-password>
        <!-- Relays log in with username 'relay' -->
        <relay-password>hackme</relay-password>

        <!-- Admin logs in with the username given below -->
        <admin-user>admin</admin-user>
        <admin-password>hackme</admin-password>
    </authentication>
Here, make sure you replace the default
hackme password with your own password(s).- hostname, listen socket port, bind address and stream
    <!-- This is the hostname other people will use to connect to your server.
         It affects mainly the urls generated by Icecast for playlists and yp
         listings. You MUST configure it properly for YP listings to work!
    -->
    <hostname>localhost</hostname>

    <!-- You may have multiple <listen-socket> elements -->
    <listen-socket>
        <port>8000</port>
        <!-- <bind-address>127.0.0.1</bind-address> -->
        <!-- <shoutcast-mount>/stream</shoutcast-mount> -->
    </listen-socket>
    <!--
    <listen-socket>
        <port>8080</port>
    </listen-socket>
You can choose to use these default values, which means you'll only stream on the localhost, using 8000 as the port. In this case, you'll be able to access the Icecast 2 server web page in your web browser by visiting
http://localhost:8000, and the admin page by visiting http://localhost:8000/admin. Not yet though, as we'll need to enable and start (or restart) the Icecast2 service in the next step.But you may want to change some of these settings. Replace the hostname value with the hostname/domain or IP address that will be used for the stream. bind-address allows limiting which addresses Icecast will listen on; if a bind-address is not specified (this is the default configuration) for a particular listen-socket, then the socket will be bound to all interfaces (including IPv6 if available). Port 8000 is commonly used by default by many projects, so it may already be in use, in which case you'll want to change that.
There are many other settings in this Icecast2 file, but the defaults should be enough in most cases.
3. Enable and start the Icecast2 server.
Enable and start the Icecast2 service on Debian / Ubuntu:
sudo systemctl --now enable icecast2Enable and start the Icecast service on Fedora:
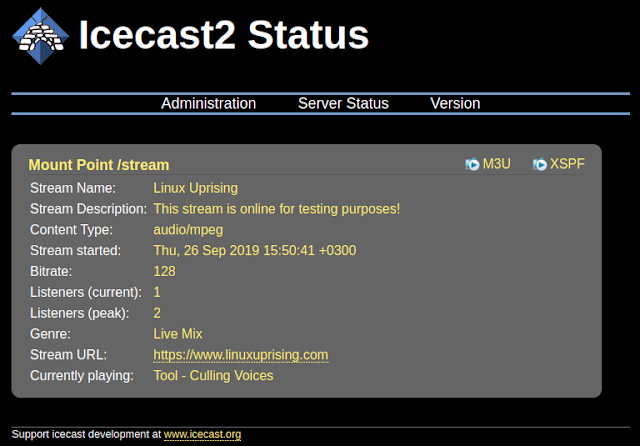
sudo systemctl --now enable icecastNow you can access the Icecast server web page in your web browser by visiting
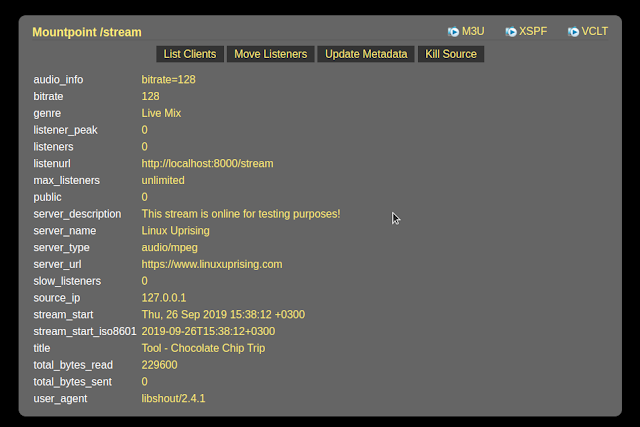
http://localhost:8000 (this is using the defaults, you may have changed this), and the admin page by visiting http://localhost:8000/admin.The Icecast2 status and admin page (showing the mountpoint info) after enabling live broadcasting in Mixxx:
Also, you'll need to restart the Icecast2 systemd service each time you make changes to its configuration file. This can be done using:
sudo systemctl restart icecast2sudo systemctl restart icecastCheck the Icecast service status using:
systemctl status icecast2systemctl status icecast4. Install Mixxx.
Download Mixxx for Linux (source, Ubuntu and Fedora packages), Windows or macOS[4].
Install Mixxx from the repositories:
- On Debian/Ubuntu, Linux Mint, Pop!_OS and so on, you can install Mixxx from the repositories (and libmp3lame0 to support MP3 streams):
sudo apt install mixxx libmp3lame0You may also install a newer version of Mixxx on Ubuntu or Linux Mint by using the PPA[5] mentioned on the Mixxx download page.
Enable the RPMFusion free (non-free is not required) repository if you haven't already:
sudo dnf install https://download1.rpmfusion.org/free/fedora/rpmfusion-free-release-$(rpm -E %fedora).noarch.rpmAnd install Mixxx and lame (for MP3 streaming):
sudo dnf install mixxx lame5. Going live with your Internet radio! Configure Mixxx to feed the audio stream to the Icecast2 streaming server.
From the Mixxx
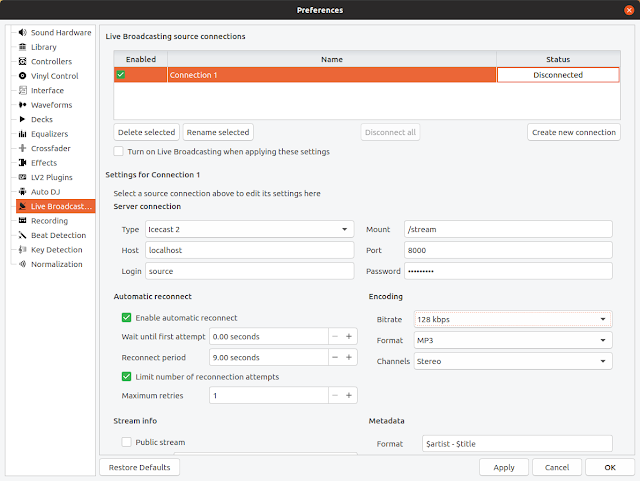
Options menu launch Preferences, then switch to the Live Broadcasting tab. Here, look under Server connection and set:- Type: Icecast2
- Host: the hostname set in the Icecast2 settings (with "localhost" as default)
- Login: source
- Password: the password you set for the "source" username in the Icecast2 configuration file (in the authentication section)
- Mount: /stream
- Port: 8000 (this is the default port, use your own custom port if you changed this)
That's all you need to set to get things working. You may also change the encoding (choose to stream to a higher bitrate or change the format from MP3 to Ogg Vorbis), metadata (the information shown when a music app plays your Internet radio station), and enable "Public stream" which adds your Internet radio station to the Icecast public directory so it can be discovered by others.
After you're done with these settings, click Apply and close the Preferences window.
It's time to add some music to Mixx. Double click a music track to add it to deck 1, then click the play button for that deck to start playing the song:
You can now start broadcasting using Mixxx by going to
Options -> Enable Live Broadcasting. After doing this, your Internet radio station will be live. There's also an icon you can click to enable/disable live broadcasting, in the upper right-hand side of the Mixxx window; this icon is also used for indicating the live broadcasting status:Use an audio player, like VLC, Audacious and so on, and open your Internet radio URL:
http://localhost:8000/stream.m3u or http://localhost:8000/stream.xspf (with localhost and 8000 being the default hostname and port, which you may have changed in the settings!). You may also find these links by visiting your Icecast2 server status page in your web browser: http://localhost:8000/status.xsl (again, replacing localhost:8000 with your hostname and port).Extra (this is optional): want to broadcast to Icecast using Mixxx, but have Mixxx remain silent on your system, and have only your Internet radio listeners hear the audio (this also makes every sound from your system not go through to the Icecast stream, so only the sound output from Mixxx is played on the Icecast stream)? You can run JACK with a dummy output for this. Install JACK:
sudo apt install jackdsudo dnf install jack-audio-connection-kitNext, run JACK with a dummy output driver:
jackd -d dummyAfter this, in Mixxx go to
Preferences -> Sound Hardware, and set the Sound API option to JACK Audio Connection Kit (the Master output further down below this page can be set to None or system). If you're not seeing JACK among the Sound API options, restart Mixxx.
References
- ^ Icecast (icecast.org)
- ^ Mixxx (www.mixxx.org)
- ^ Download Icecast for Linux/Unix and Windows (icecast.org)
- ^ Download Mixxx for Linux (source, Ubuntu and Fedora packages), Windows or macOS (www.mixxx.org)
- ^ the PPA (launchpad.net)
